
| Photo gallery |
|
 |
Pests Work Technology Forests |
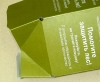 |
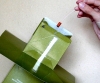
Step 1. Form the bottom Fold the bottom flaps along the impressed lines. The longer flap is folded on top of the others |
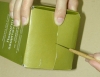 |
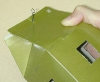
Step 2. Make a hole Using the awl we make a hole in the upper and lower flaps. |
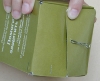 |
Step 3. Insert and fasten a paper-clip Insert a paper- clip into the hole, inside the trap; unbend two ends of the paper-clip; the outer eye of the paper clip is press to a valve. At looking the trap sideways no openings and slits must be at the bottom. |
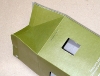 |
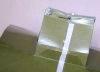
Step 4. Form a top Bend the top flaps to form the trap top. Align the pair of holes in the upper part of side flaps. |
 |
Step 5. Prepare the trap roof The roof on a trap is prepared from above; enter the flaps to horizontal openings up to the stop. The top to a trap is attached with scotch tape from both sides. |
 |
Step 6. Place a dispenser in the trap Using caution, a dispenser is placed in the trap from above, wire up to the end is brought in from the inside to the central hole of flap(an arrow) and is bent inward. Preliminarily a dispenser is placed exactly in the center of the trap opposite the entrance holes. |
 |
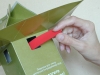
Step 7. Insert a paper-clip to the upper flap. The second paper-clip is brought into the central hole of the upper flap. |
 |
Step 8. Unbend the ends of a paper-clip We unbend the ends of a paper-clip, then direct an eye of a paper-clip upward and press maximally to the flaps. A string for hanging a trap is tied to an eye of the paper-clip. |
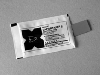 |
Step 9. Getting an fumigant strip Using a knife or scissors cut a package of fumigant strips and get a strip. |
 |
Step 10. We throw a plate into a trap For this purpose we use one of entrance hole of the trap. Be careful, do not touch and do not bend the wire with dispenser! |
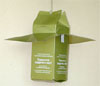 |
Step 11. Hanging a trap The assembled trap is hung using a string which is fixed to the eye of the upper paper- clip (see Step 8). |
|
This web site was developed according to the plan of the
Forest Resources and Technologies (FOREST) project funded by USAID
|